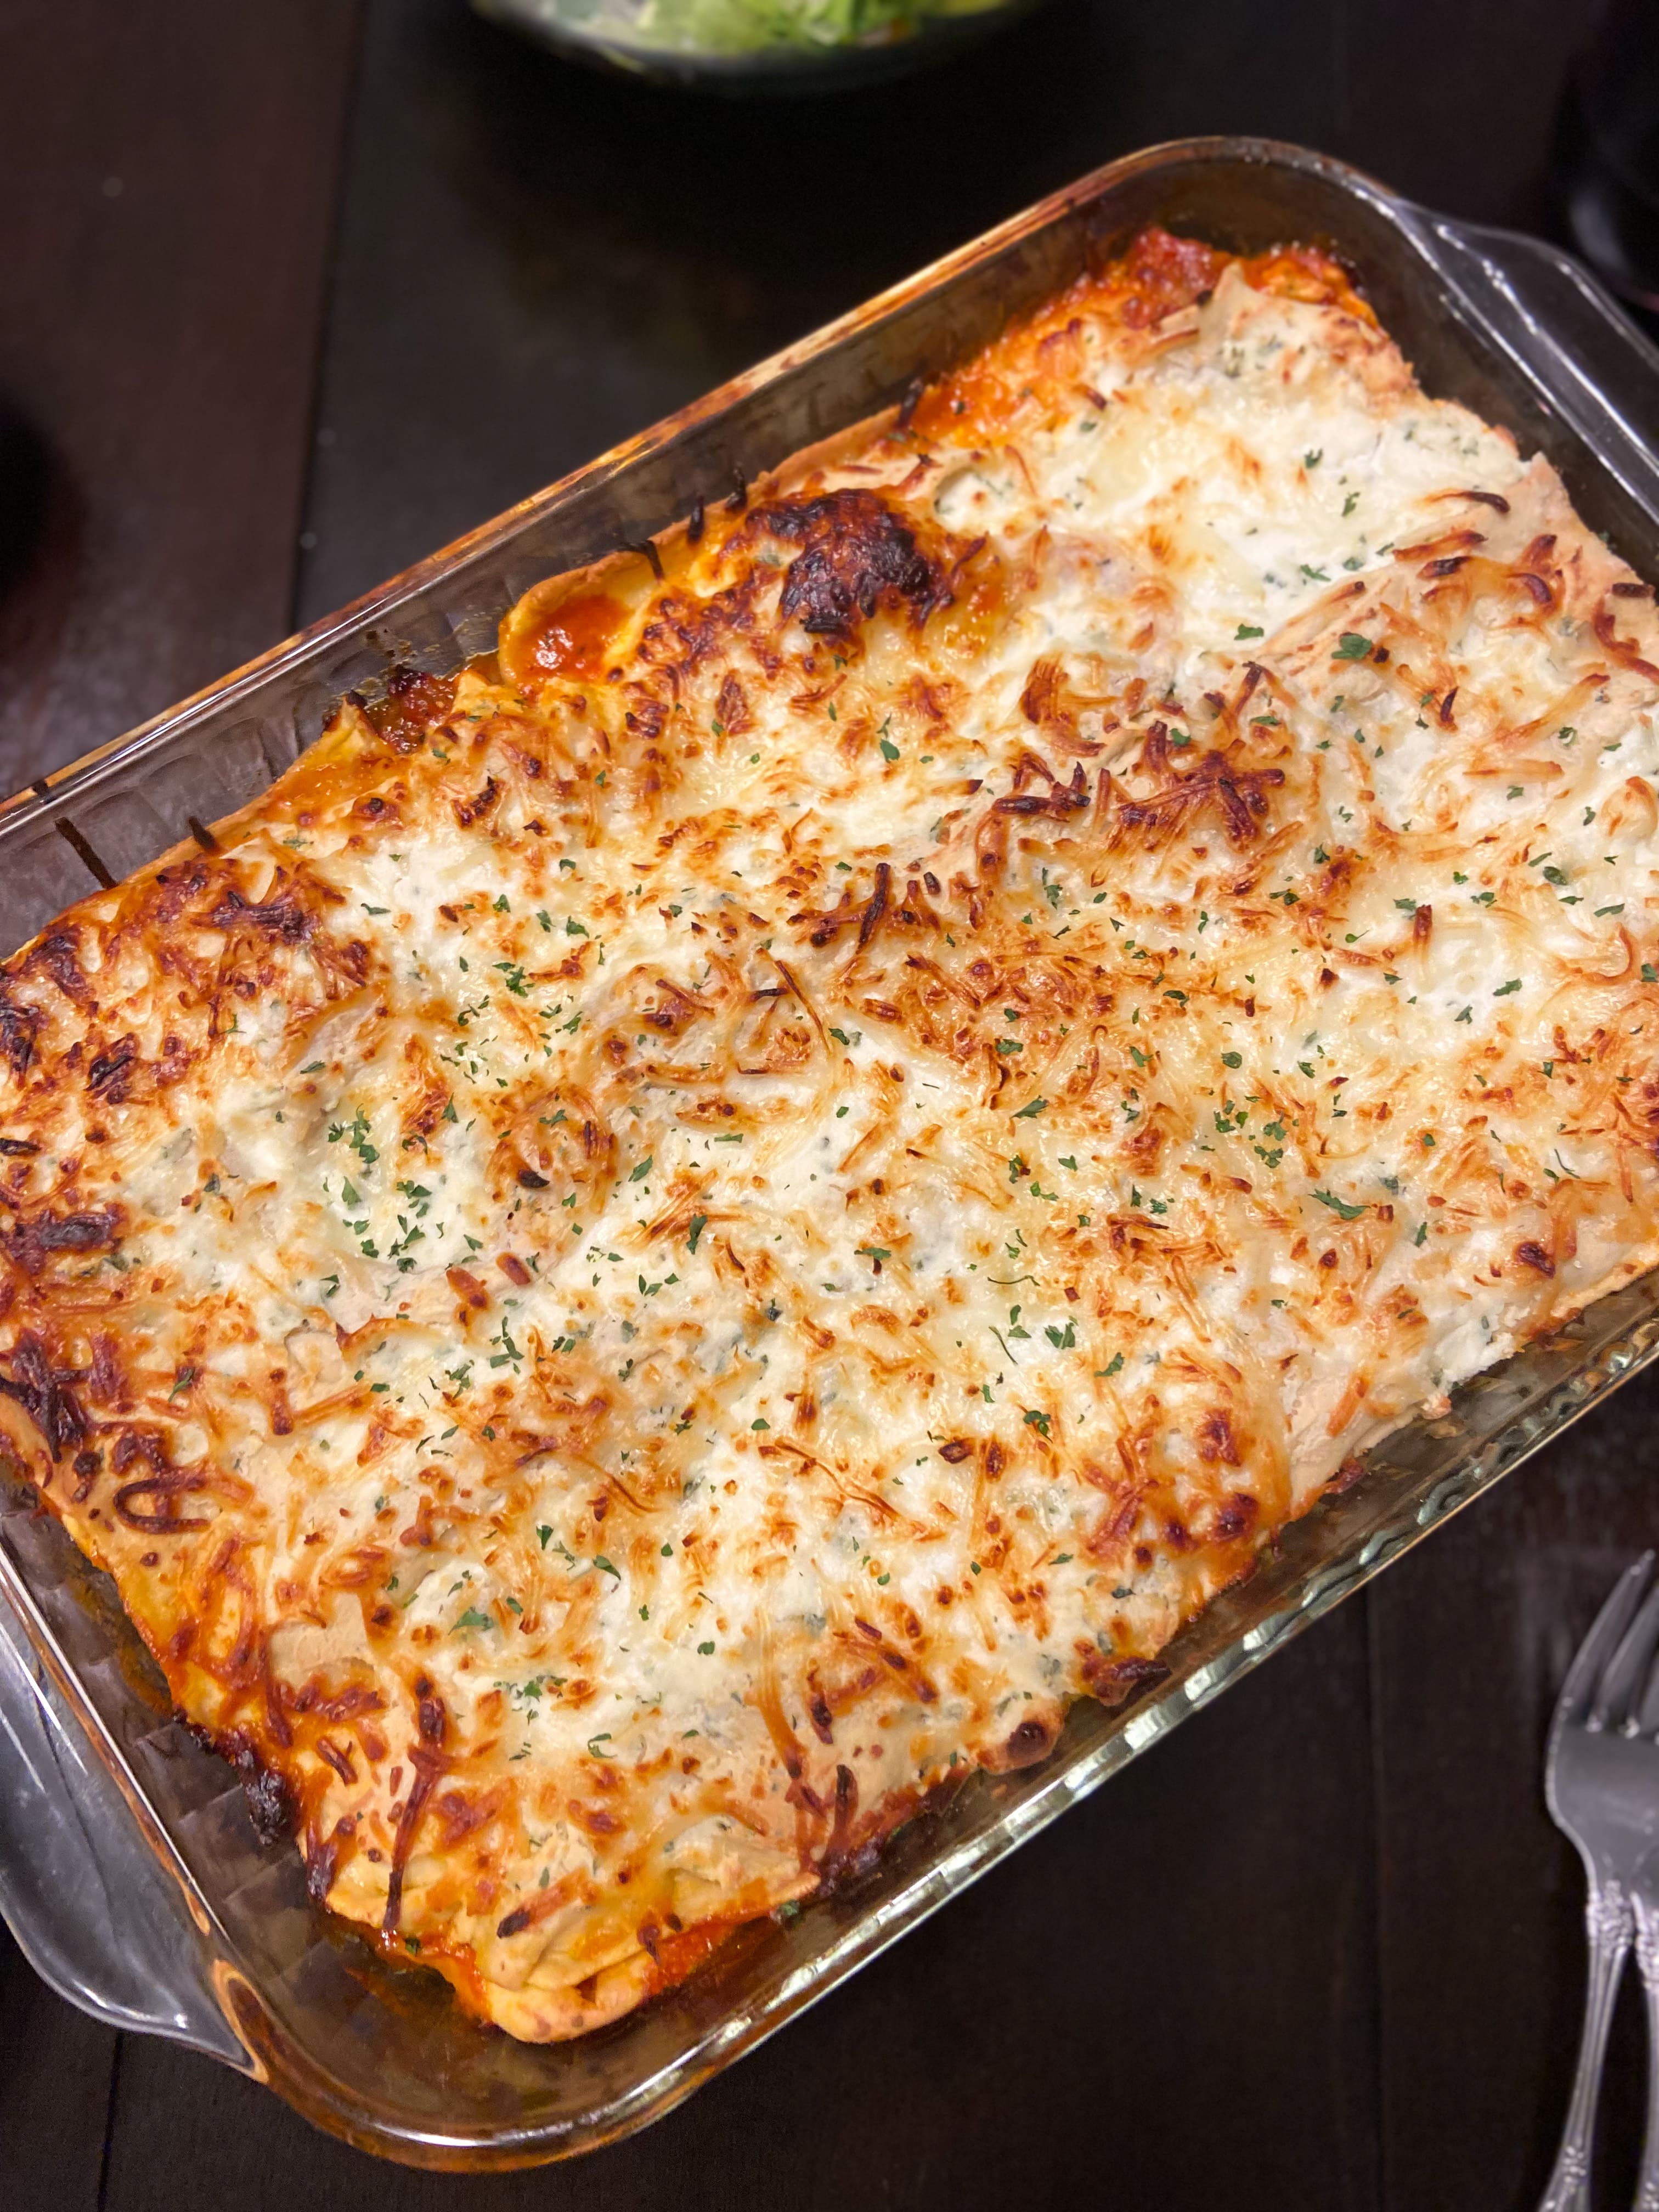
As a child, a homemade lasagna felt like a LUXURY, but it doesn’t have to be! This easy weeknight lasagna takes 30 minutes of prep and you can have a 5-star dinner. And for an extra bonus, you get lots of leftovers.
A classic meat sauce is the star element of this lasagna. However, the beef is optional if you would like to just have a tomato sauce base. Ground beef, onion, an array of spices, and crushed tomato simmers together to form a flavorful and hearty sauce.
Your cheese layer cannot be overlooked, and ricotta is essential. As a cottage cheese lover myself, I know that many people make their lasagna with that instead of ricotta. I am obsessed with how creamy and rich ricotta is, and personally feel that it can’t be left out. The cheese layer will consist of ricotta mixed with mozzarella and parsley.
For noodles, you can absolutely use boxed lasagna noodles. These should be cooked al dente, meaning they are still somewhat hard to bite into, instead of cooked fully through. As the lasagna bakes, they will soften, but baking fully cooked noodles will cause them to be soggy.
I am a huge fan of making my own pasta, which I understand is not always feasible. My mom and I took a cooking class at Dierburgs and learned to make it, and ever since I’ve been hooked. But boxed noodles work just as well, and make this a super simple dish.
The final touch to this lasagna is a layer of provolone cheese. The salty cheese on top of the thick layers of noodles, creamy cheese, and hearty sauce ties the whole dish together. It gets browned and bubbly and is SO good.
Serve this easy weeknight lasagna hot out of the oven with my hearty sweet kale salad on the side.
Save the leftovers in the fridge for up to 4 days, or freeze them for up to 2 months.
Homemade lasagna doesn't have to take forever! Make an incredible dinner any night of the week with this easy weeknight lasagna
Prep Time30 minutesmins
Cook Time30 minutesmins
Total Time1 hourhr
Course: Main Course
Cuisine: Italian
Keyword: easy weeknight dinner, lasagna
Servings: 8servings
Equipment
9x12 baking dish
Ingredients
1 lbground beef
1onion, chopped
1tbspolive oil
228 oz cancrushed tomatoes
2tspfennel
1tbspbasil
1tbsporegano
1tspsalt
2 tspminced garlic
15 ozricotta cheese
1 Cmozzarella
6slicesprovolone cheese
1tspparsley
16ozlasagna noodles
Instructions
Boil your lasagna noodles until they are al dente- they should be a little bit firm still. Drain and set aside
In a large pot, cook your ground beef and chopped onion in 1 tbsp of olive oil. Before the meat is fully browned, season it with fennel, basil, oregano, salt, and garlic. Add both cans of crushed tomatoes and bring to a simmer
In a small bowl, mix together the ricotta cheese, mozzarella, and parsley
Grease a 9x13 baking dish and ladle about a cup of meat sauce onto the bottom of the dish, or enough for it to be lightly covered. Layer noodles evenly across the top of the sauce and spread a layer of the ricotta cheese mixture. Repeat this process until there is no more meat sauce. Cover the top of the lasagna with provolone slices
Bake at 400 for 30 minutes, or until the top is golden and bubbly
Chicken pot pie immediately makes me think of the frozen kinds we had as kids. There was then about a 15-year lull where I didn’t have one at all before we recently went to the Smoky Mountains and had one at The Old Mill Restaurant. Since experiencing the inspiration, I wanted to make my own lighter version of an easy homemade chicken pot pie.
Turns out, making a chicken pot pie is not difficult. You need one pan to cook down garlic, onions, and chicken. You then add in herbs, carrots, peas, and celery. Flour is sprinkled on top of all of this while it cooks so you can create a thick gravy. This is possible by adding chicken stock and a little bit of half n half to make it creamy.
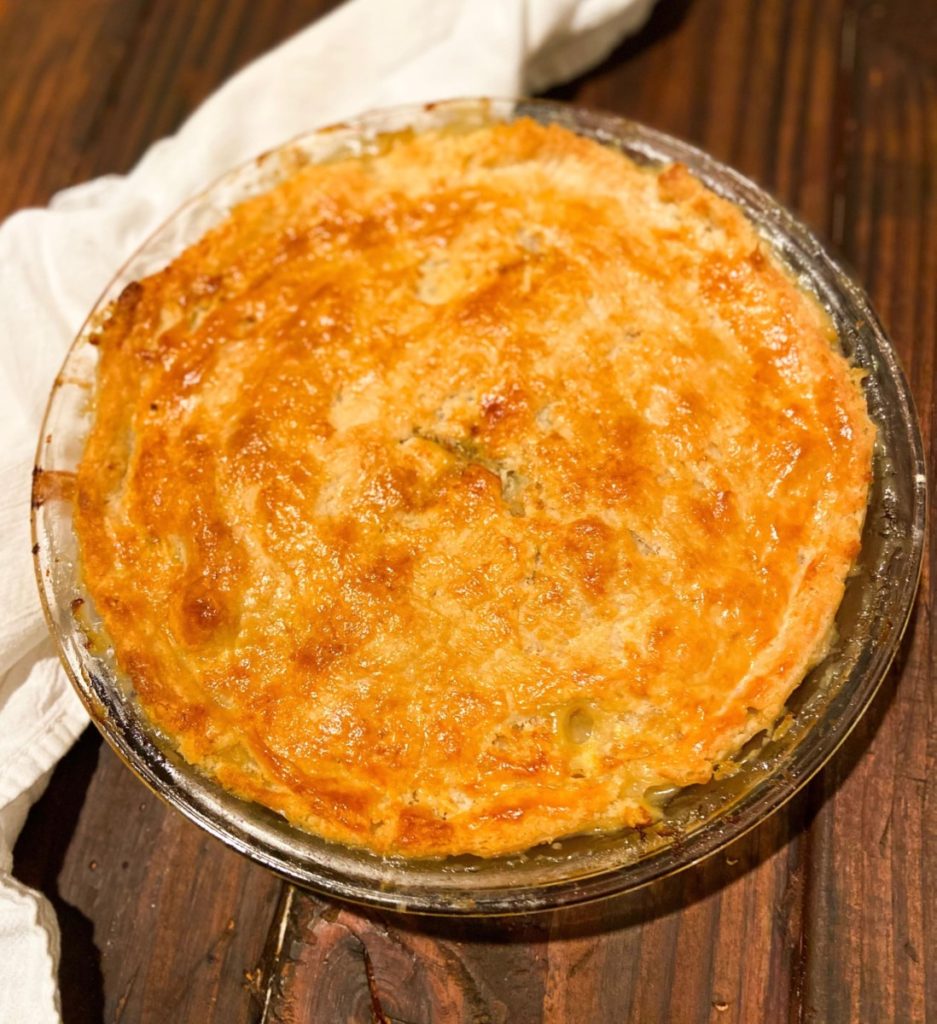
Once your filling is made, top the pie plate with pie dough before it gets popped into the oven. The pie dough might be the last piece, but it’s definitely the most important. Good pie dough is buttery, flaky, crisp, and melts in your mouth all at once.
Pie dough is simple to make, using only a few ingredients- ice water, cold butter, salt, and flour. A great follow-along tutorial and step-by-step instructions are found here. If making pie dough isn’t on the table for tonight (and that’s okay!) frozen pie dough is easy to find and works just as well.
I made my chicken pot pie with just one crust, but you’re more than welcome to make a double crust version. Just roll your first sheet of dough into the greased pie plate, add your filling, and then roll the second one on top.
If your pie plates are relatively shallow like mine are, I had to make two pies. You can also save and/or freeze half of the filling if you don’t want to make a second one.
For a completely make-ahead version, fill a freezer-safe pie plate with the filling, roll out the pie dough on top, and freeze before baking. The night before cooking it, let it defrost in the fridge overnight, and then the day of, brush the dough with the egg wash and bake at 350 for the full 25 minutes.
Once cooked, this easy homemade chicken pot pie can be saved in the fridge for up to 3 days.
Preheat the oven to 350 and have your pie dough prepared*, either store bought or homemade
In a large skillet, melt the butter and add the onions, garlic, and chicken on medium heat. Stir until the chicken starts to brown. Add in the celery, carrots, pepper, thyme, and rosemary. Sprinkle the flour over the top of everything, stirring and cooking another 3-5 minutes
Pour the chicken stock and half n half over the chicken and vegetables and let simmer for about 10 minutes. The chicken should be cooked through and the broth should be turning into a thicker sauce
Using a small bit of butter, grease the bottom of the pie plate. Pour the chicken pot pie filling into the dish**. Beat the egg in a separate bowl
Roll the pie dough over the chicken filling, trimming excess around the edges. Either poke holes across the top with a fork or create an x in the middle with a knife. Brush the top of the crust with the egg wash
Bake for about 25 minutes, or until the crust is golden. I recommend placing a cookie sheet on the rack under the pie plate to catch any of the filling that may bubble up and over
Notes
*I made this recipe with just a top crust, but you can also do a two-crust version as well. Before pouring your filling into the pie plate in step 4, roll out your first pie crust into the pan. Pour in the filling, and then continue on with steps 4-6**Depending on how deep your pie plate is, you may need to use two pie plates to bake it all at once, or only use half the filling. If you use only half, you can freeze the second half of the filling.
Bread that is both beautiful and delicious is also easier than you think. This holiday focaccia bread is so simple and customizable to create a stunning piece for your festive table.
Focaccia bread is so incredibly delicious, but I had no idea how easy it was to make as well. There’s a small amount of time spent mixing the ingredients, and then it needs about two hours to rise. Once your dough has risen, it gets heavily coated in olive oil and you get to start the fun stuff.
Dimpling the dough with your fingers is so satisfying, but also is necessary to create the little pockets for your toppings to rest in. Adequately oil your rimmed baking sheet and spread out the dough to reach all the corners. Drizzle some more olive oil on top and lightly press your fingertips all over the bread, creating a surface covered in dimples.
The base of this recipe, the dough itself, can be used in combination with any toppings. Flowers made from vegetables, random patterns of delicious toppings, or just cheese are all popular options.
However, for this holiday concoction, I used caramelized onions, cranberries, brie, and fresh rosemary and sage. When I think about a classic holiday combination, cranberry and rosemary immediately come to mind. And brie, because obviously, cheese makes everything better.
I used fresh cranberries, but they were more tart than I was anticipating. You could very easily substitute craisins to create a sweeter bread.
I scattered the toppings all across the bread, but if you’re feeling extra festive you can easily form a wreath or tree with the toppings.
While baking, I do love a good holiday drink to sip on. I paired this with my festive cranberry mule, and the cranberry/rosemary pairings in both make them very complimentary of each other.
1/2Ccranberries or craisins fresh cranberries will be tart, craisins will be sweeter
1blockbrie, cubed
fresh rosemary sprigs
fresh sage
salt and pepper
Instructions
Before class
In a large mixing bowl or stand mixer with a dough hook, mix the yeast and warm water together and let it rest for 5-10 minutes. Then add the flour, salt, olive oil, garlic, rosemary, and thyme. Mix until the flour is completely combined and the dough springs back slightly if press on it. Add more flour (up to 1/2 C) if needed so that the dough is workable and not completely sticky. Cover with a clean towel and set aside for 1-2 hours.
Making the Bread
Preheat the oven to 425
In a small skillet, add your butter and sliced onions and cook on low to medium heat until the onions start to turn a golden brown
Lightly grease a rimmed baking sheet with olive oil, and spread out the dough all the way to the corners. Spread more olive oil on top and using your fingers, dimple the dough so that there are little pockets for the toppings to rest in
Top the focaccia with the caramelized onions, cubed brie, cranberries, rosemary, and chopped sage
There’s something about the idea of roasting a whole chicken to me that feels very old school and classic, yet is also very simple and elegant in a way. I think it has become a lost skill, as we now tend to cook in smaller amounts and not use the whole chicken. As someone who enjoys tackling new skills in the kitchen, I was very excited to take on making my first whole roasted herb chicken.
This chicken turned out as well as I could have hoped for, and it was much less difficult and time-consuming than I would have expected. And with each time making it, I think the process will go faster and be more successful each time.
I have gleaned ideas from many many people over the last year about the best way to make a chicken, and I think these combined tips are what made this a success. Samin Nosrat, the author of Salt Fat Acid Heat, explains that cooking a bird that is not at room temperature sets them up for unevenly cooking the meat. If the whole chicken is not at room temperature, the inside of the bird will not heat through at the same rate that the outer meat does. Therefore, it is important to set your chicken out 2-3 hours before you plan to cook it.
Also, I have seen many people, including my mother, cover the chicken with a butter-soaked cheesecloth to prevent it from drying out. This also helps create a barrier for the skin so that it doesn’t burn, especially the wings.
Roasting your chicken on a bed of vegetables and spices instead of a rack significantly increases the flavor throughout the meat. The juices from the chicken soak into the vegetables while the roasting vegetables also layer in flavor to the bird in the time that it is all roasting together. Additionally, you have an easy side to go along with your chicken with no extra work.
Lastly, your whole chicken carcass and leftover vegetable scraps can be used to make insanely nutrient-rich bone broth. Instead of throwing it all away, it is an incredibly easy way to use every bit of your food and create a flavorful base for meals in the future.
Now for actually making your whole roasted herb chicken-
To start, bring your bird to room temperature for 2-3 hours before you plan to roast it. While this is warming, you can prepare your vegetable and herbs
A cast-iron skillet, dutch oven, or any oven-safe dish that is at least several inches deep will work to roast the chicken in. Toss the vegetables in olive oil, salt, pepper, and place fresh rosemary and thyme on it.
To prepare the chicken, pat dry and stuff the cavity with onion, fresh herbs, and half a lemon. Create two pouches between the meat and the skin and place two herbed slabs of butter in between. Then create an herb rub of olive oil, garlic, and spices to rub into the whole chicken. After the legs are tied together and the chicken is placed on top of the vegetables, tuck the butter-soaked cheesecloth around the whole bird.
Cook the chicken at 400° F for 90 minutes. Using an instant-read thermometer check the temperature of the meat. The breast should be cooked to 170° and the thighs cooked to 180°. At 90 minutes, remove the cheesecloth. If the wings are looking significantly more browned than the rest of the bird, cover them with small pieces of tin foil for the remainder of the time. Let the bird sit for 15 minutes before cutting into it.
A roasted whole chicken is easier than you think, and with a couple of helpful tips its can turn out beautifully every time!
Prep Time2 hourshrs
Cook Time1 hourhr30 minutesmins
Total Time3 hourshrs30 minutesmins
Course: Main Course
Cuisine: American
Keyword: roasted chicken, whole chicken
Equipment
large pot or skillet that is oven safe
cheese cloth
twine or something to tie the legs together
Ingredients
1 4-6lb chicken
5-6potatoes, quarteredany full sized variety will work
3 whole carrots, chopped into large pieces
3 stalkscelery, chopped into large pieces
1 stickbutter, divided
2/3C olive oil, divided
3 cloves minced garlic
5-10rosemary sprigs
2 tsp chopped or dried rosemary
2 tspthyme
5-10sage leaves
salt and pepper
1/2 lemon
1 1/2 onions, quartered
Instructions
In either a large cast-iron skillet or oven-safe baking dish, create a base with your poatoes, carrots, celery, and 1 onion. Drizzle about 1/3 C of olive oil over the top, and sprinkle salt and pepper as desired. Mix well and place half of your sage and rosemary on top
In a small bowl, mix about 1/3 C olive oil, salt and pepper, garlic, rosemary, and thyme. Set aside
Cut the stick of butter into thirds and set one third aside in a separate microwave-safe bowl
With the two remaining chunks of butter, mix in the remaining rosemary and thyme and flatten the two pieces of herbed butter
Pat your chicken dry and remove any innerds. Rub the olive oil and herb mixture over the whole bird. Fill the cavity with the remaining onion, lemon, sage leaves, and rosemary sprigs. Then gently create two pockets between the skin and the meat on the breast, just above the cavity. Slide an herbed butter slab into each cavity. Tie the chicken legs together with twine
Place the chicken on top of the vegetable in the pan. Melt your remaining butter until it is melted, and then dip your cheesecloth in until it is fully coated. Tuck this around your bird to prevent it from drying out
Bake at 400° F for at least 90 minutes, or until the breast is cooked to 180° and the thighs are 190°. At 90 minutes, remove the cheesecloth so that the skin can brown and crisp up. If the wings are looking significantly more browned, you can cover them with foil so that they dont burn
Leftover kale? Or a whole bunch of kale that you’re unsure what to do with? Creating a quick hearty sweet kale salad is the perfect way to use up a bunch of greens.
Kale can be so bitter and too chewy to eat raw, but massaging a fresh dressing into the leaves helps tenderize them and create a flavorful and less bitter bite.
The ideal salad has many ~layers of flavor~ to round it out. A tangy vinaigrette is the perfect combination of flavors and helps with tenderizing the kale. Mixing up finely chopped onions, garlic, olive oil, apple cider vinegar, herbs, and spices takes only minutes and is so much better than using a store-bought bottle of dressing.
Roasting pine nuts adds a salty nutty element to the salad. Top the rest of the kale with sweet craisins, crisp apples, and savory cheese. Serve this hearty sweet kale salad chilled and enjoy!
This salad can be kept in the refrigerator in an airtight container for up to 3 days. Any extra dressing can be saved in the refrigerator for any other salads.
A hearty salad with sweet cranberries, a tangy dressing, nutty toppings, all on top of a chewy kale bed
Prep Time15 minutesmins
Course: Salad, Side Dish
Cuisine: American
Keyword: kale salad, salad, side dishes
Servings: 4people
Ingredients
Salad
4 Cchopped kale
1/4 C toasted pine nuts
1/4 C cooked quinoa
1/2 apple, chopped
1/4Cdried cranberries
1/4Ccheese mozzarella, parmesan, or goat cheese
Dressing
2 tbspapple cider vinegar
1/4 C olive oil
1 tbsplemon juice
1/4 onion, chopped
1tspminced garlic
salt and pepper
2 tspbasil
2 tsporegano
Instructions
Cook the quinoa according to directions. Add pine nuts to a small skillet on low to medium heat, stirring every couple of minutes until the nuts are toasted and fragrant
Mix ingredients for the salad dressing in a small blender or shaker, and massage over the kale
Top the kale and dressing with the toasted pine nuts, quinoa, apple, cheese, and cranberries
Italian stuffed peppers are the epitome of easy, cozy, & savory dinners. My Grams always made stuffed peppers and as a child, I never did appreciate them. Now, they’ve earned a permanent spot in our winter dinner rotations.
Stuffed peppers are simple to make during the week, or an ideal dish to make for meal prep. They reheat so well and are so easily portable.
I will be fully transparent, that I just learned how to cook the best pepper though. Before, I could never figure out how to get the pepper cooked all the way without putting it in the oven for over an hour, and it still never seemed cooked through enough. Turns out, all you need to do is boil the peppers for just two minutes each before you fill them. Boom- a perfectly cooked, crisp-tender, bell pepper.
To create these mini-masterpieces, cook up your yellow onion and ground beef in a heavenly combination of Italian spices and lots of garlic. Mix in your rice of choice, cheese, and marinara sauce. I am partial to my essential Italian herb sauce, but if you have to go with store-bought, Classico is my go-to brand.
Boil your peppers, and fill ’em up. Top with extra cheese and bake them til they’re heated through and the cheese is bubbling on top.
These Italian stuffed peppers can be saved in the fridge for up to 5 days. Reheat for 2-3 minutes in the microwave.
Quick, savory, hearty & healthy stuffed peppers make a perfect dinner or meal prep
Prep Time30 minutesmins
Cook Time15 minutesmins
Total Time45 minutesmins
Course: Main Course
Cuisine: American, Italian
Keyword: Italian stuffed pepper, stuffed pepper
Servings: 6people
Equipment
baking dish
Large pot
Ingredients
6 green peppers
1 lb ground beef
1Ccooked brown rice white rice or quinoa work too
24ozmarinara sauce
1 yellow onion, chopped
salt & pepper
1 tbspminced garlic
2 tsporegano
2 tspthyme
2 tspbasil
1/2Cshredded mozzarella (plus more to top)
Instructions
In a large skillet, cook the onions and ground beef through completely. Season with salt and pepper, garlic, oregano, thyme, and basil. Once cooked, remove from the stove and set aside.
In a large pot, bring about 4 cups of water to a boil and preheat the oven to 350
Clean the peppers and cut the tops off, leaving an open and free-standing pepper. Once the water is boiling, drop half of the peppers in at a time, boiling for 2 minutes each. Remove from the boiling water and place into a lined baking dish
Combine the cooked ground beef and onions, cooked rice, marinara sauce, and 1/2 C of mozzarella and mix well. Fill each pepper to the desired amount, and top with cheese
Bake stuffed peppers for 15-20 minutes or until the cheese on top is browned and melted
Notes
There will most likely be extra meat filling for the peppers. You can fill more peppers and freeze them, or freeze just the filling, in an airtight container. These will stay good in the freezer for up to 3 months. For meal prepping and saving these stuffed peppers, store them in the fridge in an airtight container for up to 5 days. Microwave for 2 minutes.To reheat frozen filling: Defrost in the fridge overnight and heat up the next day.To reheat frozen stuffed peppers: Defrost in the fridge overnight. Microwave for 2 minutes or Bake for 15 minutes at 350.
Welcome, I’m Libby!
I love to eat GOOD food, and want to help others realize they can make balanced and delicious meals themselves too. From breakfast to dessert, and everything in between, let’s make something delicious together!