As far as pies go, my Grams’ pecan pie absolutely takes the cake. It’s the perfect ratio of sweet, gooey, and flakey, and topping it with some vanilla ice cream or whipped cream truly takes it to another level. I think everyone deserves to experience that kind of happiness, so I highly recommend trying it out.
I am a sweets person, no doubt about that, but I truly think this is my favorite of all the desserts my family made while growing up. I actually can’t imagine having a Thanksgiving without it. Pumpkin pie is not even on my mind if I know this baby is gonna be at the table. With that said, I am turning a corner with pumpkin pie, and do quite enjoy my recipe, which you can check out here.
Obviously, I always prefer to use a homemade crust for this pecan pie. I have always loved America’s Test Kitchen and their recipes are always 10/10, and their pie dough is no exception.
However, there’s no need to make it more difficult on yourself and make every single thing from scratch. I fully believe in mixing in some store-bought items and preventing a little extra stress. Frozen pie dough works very well and I have used it with this recipe many times. There is no need to prebake your pie crust.
Using cooking spray or butter, grease your pie plate and roll out the pie crust. Set aside
In a small bowl, whisk the eggs thoroughly until there are no large streaks of egg white
In a saucepan, melt the butter and add in the sugar and corn syrup on low to medium heat. Stir continuously for about 5-10 minutes or until the sugar crystals have dissolved and the mixture is thin and smooth. Once this is accomplished, turn the heat to low
Temper the eggs by adding a spoonful of the sugar mixture into the eggs, while stirring continuously. If the sugar hardens around the fork, just add it back into the saucepan. Once the eggs are warmed, slowly add them to pot with the sugar, stirring constantly
Add vanilla and pecans
Fill pie shell and create a collar to protect the pie crust by lightly covering just the edges of the pie plate with tin foil. Bake for 40-45 minutes
Notes
The eggs should be room temperature to easier incorporate them into the hot sugar mixture. If the eggs are too cold and added too quickly to the hot mixture it will cause them to scramble. Ensure are warmed slightly, either by using ones that are room temp or have been slightly heated by a small amount of the hot mixture. It is common for them to be too cold and the corn syrup will harden around the fork immediately- just scrape it back into the pot and it will redissolve. If this happens, try again and then very slowly add them to the hot pan. You may add the collar to the pie crust either from the start or halfway through baking to prevent the pie crust from burning before the filling is fully cooked
If you can manage to have leftovers, keep them covered in a container at room temperature for up to 3 days or in the refrigerator for up to 5.
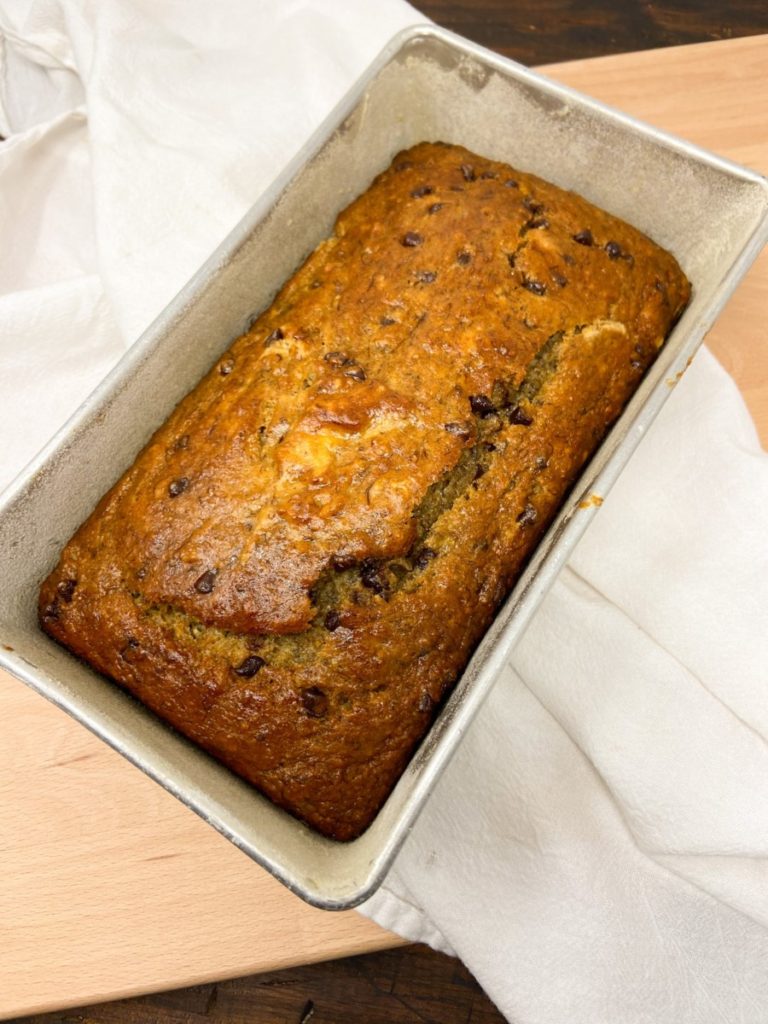
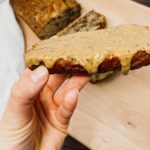
Every so often I remember I should make my chocolate chip banana bread and I’m reminded why its the best. every. single. time. So here’s my humble brag on this banana bread- its the most moist and soft even a couple days after you make it, it’s not overly sweet, the chocolate chips are the most ~perfect~ touch, and you can eat it for breakfast and not even feel bad.
My mom has been making this since I was in middle school (at least) and by the time I got to high school she was making it for every single swim meet for all four years- that’s a lot of loaves of banana bread. But there she was, happily making it for us because it was a tradition she had started.
So now all of you need to be able to experience the wonders of this chocolate chip banana bread. Top it with peanut butter or a mixed nut butter (my favorite ever is from Costco) and have it for breakfast, a snack, or for dessert!
I usually double this loaf and keep one frozen and on hand at all times. It’s super easy to make up two loaves at once, and if you’re doing the work once you might as well get twice the reward.
3/4 c whole weat flouryou can use a full 1 1/2 c of the same flour if needed
3/4 call purpose flour
1/2cmini chocolate chips
Instructions
Preheat the oven to 350
Mash the bananas with a fork
Add eggs and milk and combine well. Then add flour, baking soda, baking powder, salt, and sugar and encoporate completely
Fold in chocolate chips
Spray the bread loaf with non stick spray or coat with butter and flour the inside evenly. Add the banana bread batter
Bake for 40-45 minutes, until the loaf is cooked through and the top is lightly golden
Notes
I usually double the recipe. Just double the ingredients and divide the batter into two floured bread loafs and bake for the same length of time.I wrap the loaf in Saran Wrap and then tin foil to help keep it moist. You can keep this on your counter or refrigerator for up to a week. You can keep the loaf frozen for up to 6 months, first wrapping it in Saran Wrap, then foil, and ensuring it is completely covered in both layers to prevent freezer burn.
My Dad’s mom, Grams, made this double chocolate cake every time we visited for my entire childhood. This cake is my Dad’s favorite cake in the world and the birthday cake that he chooses every year! This beauty has two moist and rich layers of chocolate heaven that are wrapped up in perfect velvety chocolate icing.
The secret? It’s the Hershey’s! Disclaimer- this is Hershey’s Cocoa cake, with some minor adjustments. This cocoa adds such a rich flavor to the cake and frosting, and is really so much better than any other brand of cocoa- it’s worth it to use the good stuff for this.
The batter for this cake will be runny. Mix up your ingredients as usual, but adding a cup of hot coffee creates the thin batter as well as enhances the rich chocolately flavor and makes it soooo much better.
This frosting is a simple chocolate buttercream, but adding instant coffee really takes it to the next level. This easily makes enough to frost a two-layer 9″cake.
I prefer to make 6″ cakes, so this cake will make enough for 3 6″ layers. I also had to double the frosting recipe to ensure there was enough for between the layers.
If desired, you can add a chocolate ganache on top of the cake for a dramatic topping and make it triple chocolate. Ganache is easy to make, but you have to do it in the right way for the best results.
Chop your chocolate into small chunks and set them aside in a bowl. Add your heavy cream to a small saucepan and simmer it until it is just starting to boil and immediately pour it over the chopped chocolate. Let this sit for at least 15 minutes without stirring it or messing with it in any way. Once the time has passed, you can stir the chocolate and heavy cream together, getting a smooth ganache.
Do not microwave your heavy cream, it heats unevenly and will not melt the chocolate evenly. If you stir the chocolate and heavy cream right away you will create a grainy ganache. Let the ganache cool completely before you pour it over the cake or it will be too runny to control.
1c boiling coffee or waterYou can also do 1/2 C of each, but only use 1 C total
Chocolate Icing
1/2 c butter
3/4 cHershey's cocoa
3 c powdered sugar
1/3 c milkthe higher the fat content the better
1 tspvanilla
1 tspinstant coffee
Chocolate Ganache
4 ozchocolate barbe sure to not use chocolate chips- they will effect the consistency of the ganache and it won't be as smooth
4 oz heavy cream
Instructions
Chocolate Cake
Preheat oven to 350
In a large bowl, combine all of the dry ingredients and set aside
In a separate bowl, combine the eggs, milk, vegetable oil, and vanilla. Add the dry ingredient mixture and mix well
Add only ONE CUP of either boiling water or coffee and mix well. This batter will be very watery
Using nonstick spray or butter, coat both of the cake pans and then thinly coat with cocoa powder
Divide the batter evenly into the cake pans and bake for 30-35 minutes
Allow cake layers to cool completely before icing
Chocolate Icing
Using either a stand mixer or hand mixer, beat the butter until it is creamy and smooth
Add the cocoa powder, powdered sugar, instant coffee, and vanilla. Slowly add milk and continue to beat until the icing is smooth. Adjust thickness of the icing by adding more milk or powdered sugar until it is at a desired consistency
Frost cooled cake layers
Chocolate Ganache
Chop chocolate bar into small chunks and set them aside in a bowl
Heat the heavy cream in a small saucepan, stirring it every few minutes, until it is just boiling and remove it from the heat immediately
Pour the heavy cream over the chopped chocolate and leave it untouched for at least 15 minutes before stirring it to prevent a grainy texture. Once ready, stir until the ganache is completely smooth
Once the ganache has cooled completely, pour it onto the cake in the center and using a spoon, smooth it out towards the edge of the cake until it drips down and the top is evenly covered
Notes
The coffee enhances the chocolate flavor, but is completely optional.Boil the water in a pot on the stove or microwave the coffee.
Save leftovers of this in a sealed container at room temp or in the fridge for up to a week. As if they make it that long…
OH EM GEE. This salted caramel apple crisp, topped with some vanilla ice cream, is truly the best apple crisp I have ever tasted- and I’m allowed to say that because it’s just a spin off of my mom and grandma’s recipes that they’ve made for years. Its hot & cold (with ice cream!), soft & chewy, salty & sweet, crisp & melty all at once!!
This recipe has a few different moving pieces, but I promise making your own caramel really makes the difference. It looks a little overwhelming all laid out but once you start it really is very easy. This salted caramel apple crisp will knock the socks right off of anyone you serve it to.
Some people may not be into all the jazz of this and want just a plain apple crisp. You do you, boo. Leave out the caramel, nuts, sea salt, or ice cream if you would like.
Flakey sea salt is borderline pricey when you’re talking about buying salt. I found a box of Maldon at Schnucks but it is also sold on Amazon for a better deal. They’re a great addition to sprinkle on top of chocolate, brownies, lattes, or caramel anything.
Keyword: apple crisp, dessert, fall dessert, fruit dessert, salted caramel, salted caramel apple crisp
Equipment
8×8 or 9×9 baking dish
Ingredients
Filling
4cgranny smith apples about 4-5 apples, sliced and peeled
1/4 c sugar
1 tsp cinnamon
1pinchsalt
1/4 tspnutmeg
Topping
1 c flour
1/2 c sugar
1 tspbaking soda
1 tspbaking powder
1 tsp salt
1 egg
1/2 c butter
1/4 c chopped pecansoptional
Caramel Sauce
3/4 c heavy whipping creamthere is a soy version by Silk
3/4 cbrown sugar
1tspvanilla
1 pinchsalt
1/2 cbutter
Other
vanilla ice cream
flakey sea saltMaldon is a brand found relatively easily
Instructions
Preheat oven to 350
Prepare Apples
In a large bowl with the sliced apples, sprinkle the sugar, cinnamon, salt, and nutmeg and coat them evenly. Set aside for 15-30 minutes so that the juices can be pulled from the apple slices. You should see a cinnamon sugar juice at the bottom of the bowl when they are ready
Begin caramel sauce
In a saucepan, melt the butter on low. Add the brown sugar and stir continuously until the sugar crystals dissolve and the consistency becomes thin and smooth
Slowly add the heavy cream, vanilla, and pinch of salt. The mixture should come almost to a boil, but be sure to stir constantly to prevent the sugar from burning
Remove from heat and set aside to cool and thicken
Prepare the crumb topping
Combine flour, sugar, baking soda, baking powder, salt, and pecans. Crack the egg into the bowl and combine with your hands. This mixture will be crumbly and slightly sticky
Butter an 8×8 dish and pour in the apple slices. Sprinkle the crumb topping evenly across the apples.
Melt the butter in a small dish and drizzle across the top of the crumb topping
Bake for 40 minutes
Let the apple crisp cool and drizzle with as much caramel as desired and lightly sprinke with flakey sea salt. Serve with vanilla ice cream
Notes
For a vegan or vegetarian version, use a soy version of the heavy cream and use vegan butter. I have not tried any substitutions for gluten free versions but I’m sure you could use almond flour. I would try 1/2 C and add more as you need.Nuts, caramel sauce, ice cream, and sea salt are all optional
Check out my other favorite desserts, like my double chocolate cake or pecan pie here!
This summertime fruit pizza is my very favorite dessert for any and all summer gatherings! This has been a classic, along with my Oreo Ice Cream Cake, and has been served at every big summer event for as long as I can remember.
I’ve learned over the years that this is through and through a midwestern dish. My East coast friends thought that fruit pizza meant a Hawaiian pizza- ya know, Canadian bacon and pineapple. This was a wildly new concept to them, but I think it deserves to be a favorite from coast to coast.
This perfect little dessert has all the best summer fruits on it, and is a crowd favorite 110% of the time. I always always use strawberries, blueberries, kiwi, and cherries. Any other small berries, grapes, or mandarin oranges would work too. I would recommend staying away from apples though.
If I were an over achiever, I would make my own cookie dough to use for this recipe. Sally’s Baking Addiction is my #1 place to find the best cookie recipes. Her sugar cookies are, no surprise, top notch.
Like always, this is completely customizable to your liking. Use the fruit you like to make it your favorite!
This summertime fruit pizza is a chewy sugar cookie base topped with a subtly sweet cream cheese base and loaded with fresh fruit
Prep Time30 minutesmins
Cook Time12 minutesmins
Total Time45 minutesmins
Course: Dessert
Cuisine: American
Keyword: easy dessert, fruit dessert, fruit pizza, summer dessert
Equipment
parchment paper
baking sheet
Ingredients
16ozroll of sugar cookie doughlet this sit out of the refrigerator for about 10 minutes before working with it
8 oz cream cheeseat room temp
1/4 c powdered sugar
1 tbsplemon juice
sliced strawberries
sliced kiwis
sliced grapes in half
sliced cherriespitted and sliced in half
blueberries
Instructions
Roll out the roll of cookie dough into one large cookie onto parchment paper. This can be rectangular or round, or any shape desired, depending on the shape baking sheet
Bake the cookie at 350 for 10-12 minutes, or until the middle appears cooked through. Be sure to not let it cook until the edges get very golden, or the cookie will become crunchy. Let it cool completely
In a bowl, combine the cream cheese, powdered sugar, and lemon juice. Spread this evenly across the cookie
Decorate the cookie with sliced fruit as desired
Keep the fruit pizza refrigerated until it is time to be served
This summertime fruit pizza should be kept refrigerated until it’s ready to be devoured. Unfortunately, this is not a recipe you should make up ahead of time- serve it the day you make it.
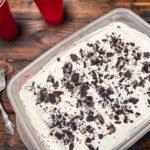
My mom has been making this Oreo Ice Cream cake for decades- it was a guaranteed dish to have at every lake trip and summer pool party. It’s cool and refreshing, chocolately and fudgey, and the cherry on top of a warm sunny day.
I think Oreo’s are the best store bought cookie, hands down. So why would we not want to turn that into a dessert? I also could probably eat ice cream every day for the rest of my life, so what could be better than pairing them together? Nothing.
This Oreo Ice Cream cake is just a bunch of layers, ~layers of flavor~ that is. An Oreo and hot fudge crust is covered with a thick layer of vanilla ice cream, and it’s all topped with cool whip and more crushed Oreos. It’s actually to die for.
You are more than welcome to make this with different flavor Oreos, like the golden or mint ones. Or you can use a different kind of ice cream too. Personally, I’m a fan of the classics, but I think a mint twist on it would be pretty fantastic.
Oreos and hot fudge create a perfect gooey crunchy crust to hold a thick layer of vanilla ice cream thats topped with fluffy whipped cream and sprinkled with more Oreo crumbles
Leaving out about 4-6 cookies, crush the entire package of Oreos and mix with the melted butter. Firmly press this layer into the bottom of a greased 9×13 pan. Freeze for 20 minutes or until the crust is solid
Warm the jar of fudge for about 30 seconds or until it is warm enough to pour out, and spread it evenly over the cookie crust. Freeze for another 20 minutes or until it has set. Once this goes into the freezer, pull the ice cream out to thaw
When the fudge has set, spread the vanilla ice cream evenly to form the middle layer. Freeze for another 20 minutes or until it has firmed up. Once this goes into the freezer, pull out the cool whip to thaw
Once the ice cream is set, spread the cool whip on for the final layer of the ice cream cake. Sprinkle the crushed Oreos over the top of the cool whip
Keep the cake in the freezer until it is time to be served
This Oreo ice cream cake should be kept in the freezer until it’s time to serve it. You can thaw it for 10 minutes before serving to make it easier to cut.
We also grew up having my summertime fruit pizza at the pool if you’re in need of another summer dessert!
Welcome, I’m Libby!
I love to eat GOOD food, and want to help others realize they can make balanced and delicious meals themselves too. From breakfast to dessert, and everything in between, let’s make something delicious together!